

Table of Contents
Paxton Net2 Integration
Connect Paxton Net2 to TetherX to review door activity alongside video, open doors remotely and manage Net2 users. The TetherBox connects to the Local API on the Windows PC running Net2 and receives live access events through a separate listener.
Before You Start
You need:
- Paxton Net2 version 6.01 or later, with access to its Windows server PC.
- A TetherBox that can reach that PC over the local network.
- The PC's IP address, Local API port and Net2 operator credentials.
- Permission to manage access control systems in TetherX.
This guide covers Net2. Paxton has chosen not to provide a third-party integration API for Paxton10, which is a separate product and is not supported by this integration. Paxton's published FAQ (opens in a new tab) states that a Paxton10 SDK/API is not on its roadmap. TetherX recommends Net2 where integrations and the more advanced functionality they enable are required.
Tip: Use the IP address of the Windows PC running Net2. Door controllers and access control units (ACUs) do not host the Local API.
Prepare the Net2 PC
Install the TetherX Licence
- Download the TetherX API licence.
- On the Net2 PC, open the Net2 installation folder. If you do not know its location, right-click the Net2 shortcut, choose Properties, then Open File Location.
- Copy the licence into the ApiLicences folder inside Access Control. The usual full path is:
C:\Program Files (x86)\Paxton Access\Access Control\ApiLicences\92ebef7c-9edc-442d-bc1c-584a7acd8bca.lic
Keep the filename unchanged. If Net2 is installed elsewhere, use the equivalent folder in that installation.
Enable the Local API
- Open Net2 Server Configuration Utility and select Security.
- Tick Enable LocalAPI. If your older version shows Disable LocalAPI, leave it unchecked.
- Click Apply and accept the service restart.
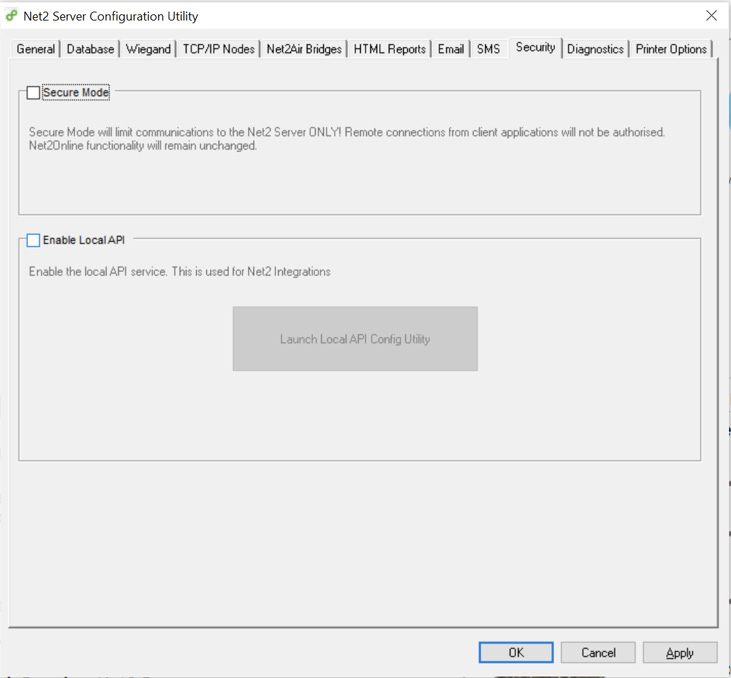
Tick Enable LocalAPI in the Security tab. Screenshot from Paxton APN-1206-AE, page 1 (opens in a new tab).
- Open Launch Local API Config Utility and check that Local API Status is Running.
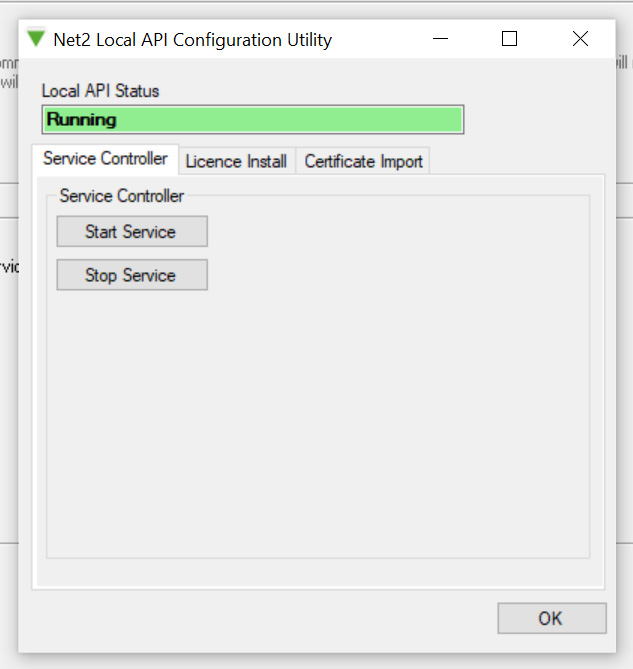
The API should show Running. Open Licence Install to check the TetherX licence separately. Screenshot from Paxton APN-1206-AE, page 5 (opens in a new tab).
- In Licence Install, check Activated Licences for the TetherX client ID:
92ebef7c-9edc-442d-bc1c-584a7acd8bca. If absent, import the downloaded licence and restart the Net2 services. - In Windows Services, check that Net2 Nginx Service is enabled and running.
Warning: Applying Net2 configuration changes restarts services. Arrange this with the person responsible for the access control system before proceeding.
Paxton requires API enablement from Net2 6.6 v6. For the Windows screens and certificate setup, follow Paxton's Local API instructions (opens in a new tab). The utility's appearance depends on the installed Net2 version.
Add Net2 to TetherX
- Open Settings → Access Control Systems.
- Click New → Paxton Net2.
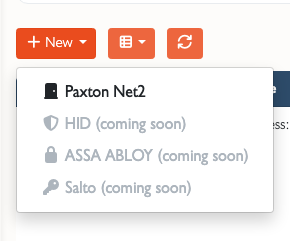
- Select the TetherBox that will connect to Net2 and enable Active when you are ready to connect.
- Enter a recognisable Name, the Net2 PC's IP Address, and its Local API Port. The default port is 8443; use the port configured on your PC.
- Enter the Net2 operator Username and Password. Use the operator account configured in Net2, such as System engineer.
- Click Create.
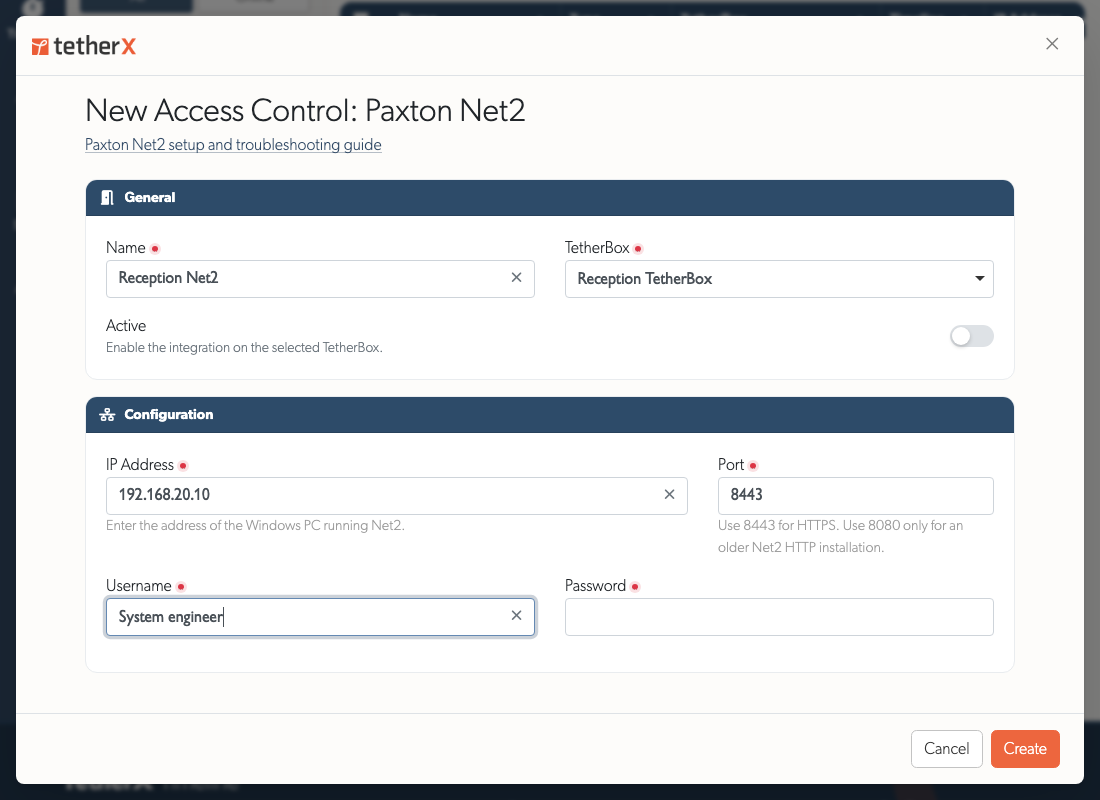
The screenshots use illustrative names and network details. Replace them with your site's settings.
Check the Connection and Fetch Data
Open the system by clicking its name in Access Control Systems. On Info, click Refresh status to check the API and live-event listener. The status details explain the last measured result and any action required.
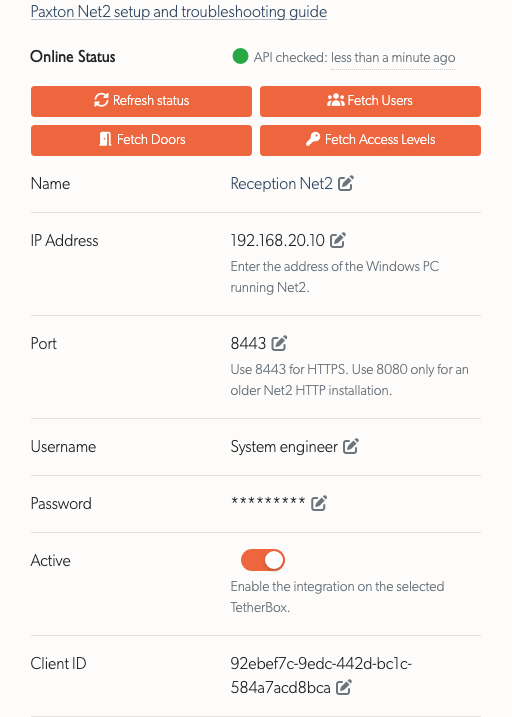
Use Fetch Users, Fetch Doors and Fetch Access Levels to retrieve the corresponding data from Net2. Once fetched, review the Access Control Units, Paxton Net2 Users and Paxton Net2 Access Levels tabs.
A green status requires recent successful API and listener checks. An orange status indicates a measured problem, such as an API failure or a stopped listener. An unknown status means TetherX does not have enough recent evidence; click Refresh status before drawing conclusions.
Link Doors to Video and Open Them Remotely
- Open the system's Access Control Units tab.
- Find the door and choose its Zone. This associates its events with the camera view for that location.
- Click Save when it appears beside the changed selection.
- Set the In Reader and Out Reader switches for the readers you want active.
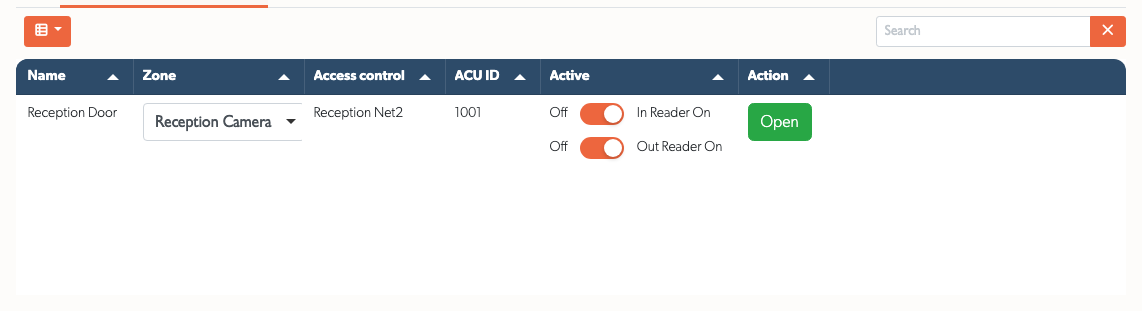
Choose a zone with a camera at the same site as the Net2 system. Its view should clearly show the doorway. When reviewing access activity, the associated video helps you check who used a credential and investigate denied access or unexpected entry.
Use Open on the door's row to request a remote unlock. Confirm that you have selected the intended door before opening it.
Manage and Link Users
Review Net2 Users
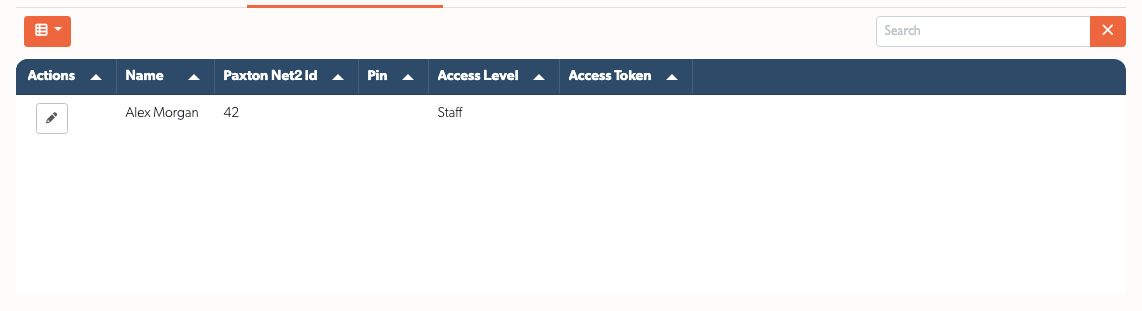
The Paxton Net2 Users tab lists the users fetched from Net2, including their access level. Use the row's edit control to change a Net2 user. Fetch users again from Info when you need to retrieve changes made in Net2.
Link a TetherX Account
For accounts with access to the Access Control tab:
- Open Users and select the TetherX user.
- Open Access Control.
- Choose the Access Control System, then the matching Paxton User.
- Save the user form.
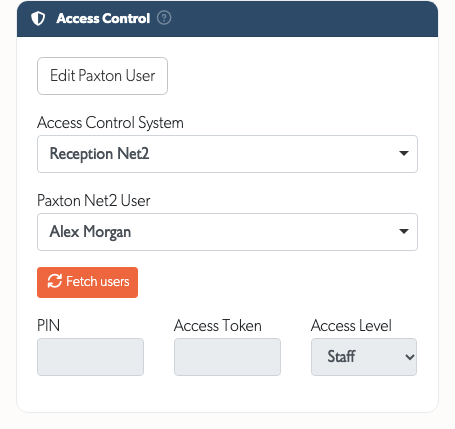
If the person has no Net2 record, use Add [name] to Paxton Net2 and complete the form. For an already linked account, use Edit Paxton User to change its Net2 details. The user tab is available to accounts with the appropriate StorBox operator permissions.
Review Access Events
Open Access from the navigation menu to review access control events. Use the filters to narrow the period and relevant activity, then open an event to review its details and associated recordings where available.
After installation, present a known credential at a door and check that the new event appears. Check the associated video as well as the event details: fetching a door list verifies an API request, but does not verify delivery of live events.
Automation and Self Storage
Paxton credentials can form part of a configured workflow with Texecom alarms, such as disarming an alarm or bypassing a tenant's storage zone when they enter. For the storage workflow and its configuration, see Self Storage.
Contact TetherX Support to scope alarm actions and notifications for your site.
Troubleshooting
Start on the system's Info tab. Click Refresh status, then open the status details and follow the guidance for the reported failure.
Cannot Connect to the Net2 PC
Check the configured IP Address and Port, then confirm that the TetherBox can reach the Windows PC across the site's network. Check Windows Firewall and any VLAN or routing restrictions for that port.
A refused connection points to the API service or listening port. A timeout alone does not establish whether the PC is offline. For a secure connection error, check the Net2 API's certificate configuration using Paxton's instructions (opens in a new tab).
Tip: Keep the connection between the TetherBox and Net2 PC on the local network. This integration does not require public internet port forwarding to Net2.
API Returns 502 Bad Gateway
A 502 response means an HTTP server answered but could not complete the API request. Doors may continue working, and the Net2 home page or API help page may still load while API calls fail.
- Recheck Enable LocalAPI, the Running status and the activated TetherX licence on the Net2 PC.
- On that PC, open
https://localhost:8443/webapihelp/, substituting the configured port if different. - Open Methods → Versions → Try it out and check the response from the API call itself. The expected result is HTTP 200.
- If Methods is unavailable, apply the Net2 configuration again to restart services and pick up the licence.
The local API test is documented in the IntoAccess API setup manual (opens in a new tab). Use the TetherX licence supplied above for this integration.
If the call fails locally too, investigate the Net2 API on the Windows PC. If it works locally, check the TetherBox-to-PC connection and TetherX connection settings.
Verify API Status in Net2 Configuration Utility
Return to Net2 Server Configuration Utility → Security → Launch Local API Config Utility. Check Running and the TetherX licence under Licence Install. See Prepare the Net2 PC for the full setup sequence.
Doors Load but Live Events Are Missing
The API and live-event listener are checked separately. If data fetches succeed but new swipes do not appear, refresh the status and look for a listener error.
Contact TetherX Support with the reported listener state and error. Messages such as node: not found, missing npm, or exit status 127 require investigation of the TetherBox listener runtime. A listener failure and a 502 from the Net2 PC require separate checks.
Collect Information for Support
Send your TetherBox serial number, Net2 version, configured API port, the status message and the time of a failed request. If you tested the API locally, include its response code.
For an API or certificate problem, collect the Net2 nginx logs around that time from:
C:\Program Files (x86)\Paxton Access\Access Control\nginx\logs
Paxton identifies this log location in its API troubleshooting instructions (opens in a new tab). Share the relevant logs with TetherX Support so the Windows API and TetherBox listener can be investigated together.
Referenced in: